The origins of Tokyo Chūsen (a traditional Japanese dyeing technique) are said to trace back to the Kon’ya (indigo dyers) of Fukagawa. They devised a method called “Sosogi-zome” (pour-dyeing), where indigo dye was poured over a stencil-patterned cloth to dye tenugui (hand towels) that had a lot of white space, a challenging process for conventional indigo dyeing methods. In the early to mid-19th century—coinciding with the emergence of indigo pour-dyeing—tenugui dyers (the predecessors of Chūsen businesses) gathered in the Kanda district. A culture flourished around custom-dyeing tenugui featuring unique designs as gifts for entertainers and hobbyists.
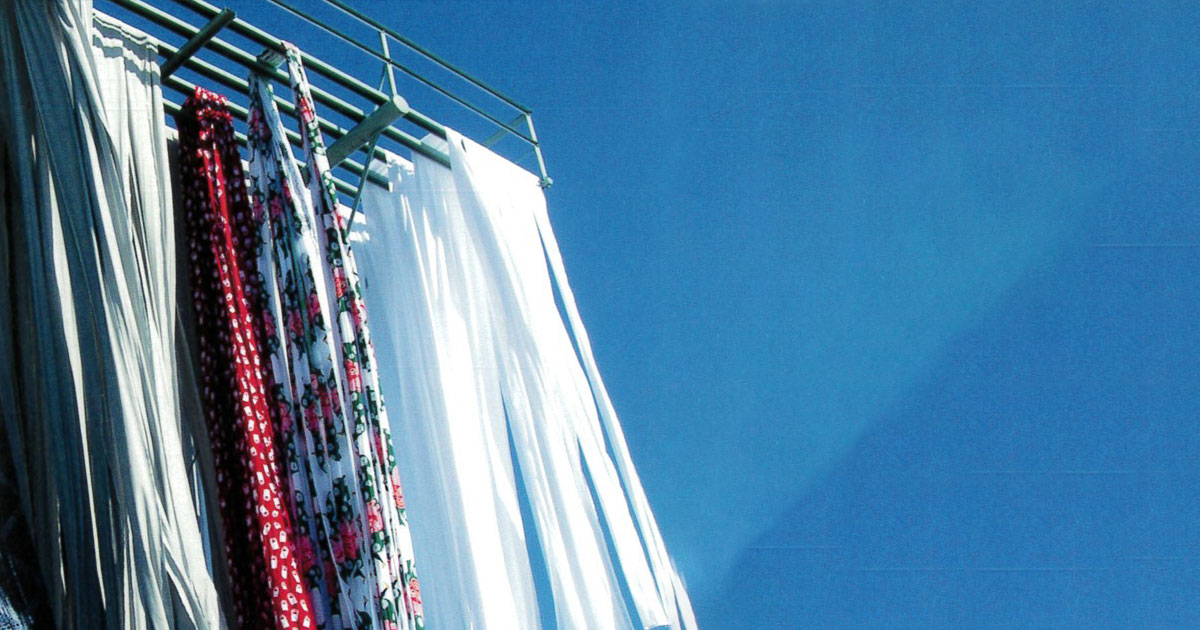
In the Meiji period (1868-1912), the modern “Chūsen” technique still used today was developed in Osaka, and subsequently spread to Tokyo. After the Meiji period, the practice of giving custom-dyed tenugui with intricate designs as gifts expanded to general merchants and industrialists, and the range of commercially available tenugui also grew. While Chūsen began with tenugui, by the end of the Meiji period, Tokyo was also using Chūsen to dye Yukata fabric. In Tokyo, Yukata had been dyed since the Edo period using the naga-ita chūgata (long-board stencil dyeing) technique, which involves precise double-sided dyeing. Tokyo Chūsen also pursued technical excellence, specializing in crisp, fine patterns, delicate shading (boshi), gradations (sakubun), and the fine hosokawa-zome technique.
Tokyo Chūsen, which values meticulous handwork, has been called “Honzome” (true dyeing) since the early Showa period (1926-1989), inheriting the playful spirit of Edo culture and the skills of the craftspeople that endure to this day. Because of the pursuit of delicate finishes in both Yukata and Tenugui in Tokyo Honzome Chūsen, both the techniques and the tools used possess distinctive characteristics.
Traditional Techniques and Skills (as designated by official notification for traditional craft products)
1. Katatsuke (Stenciling) shall be performed using the following techniques or skills:
- Using a stencil frame to which the stencil paper has been affixed.
- Applying resist paste using a spatula (hera).
- Stenciling the fabric while folding it back, for approximately one to four tan (rolls of cloth) at a time.
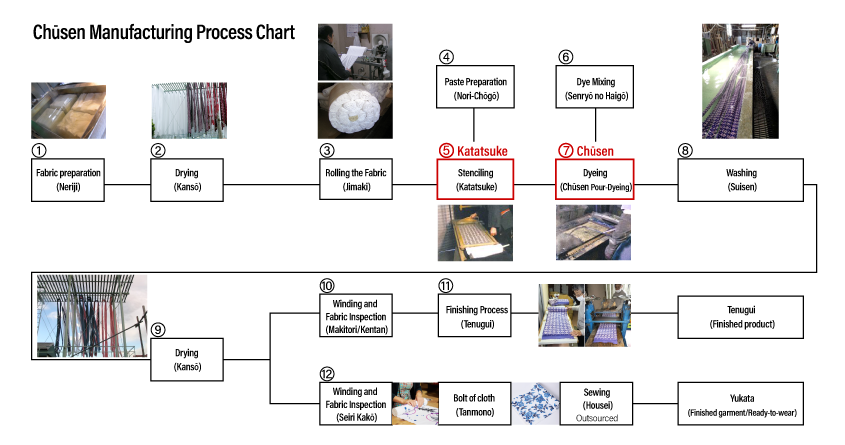
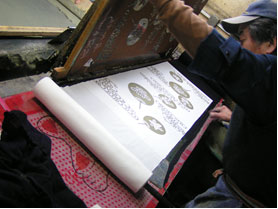
[Main Process 1] Katatsuke (Stenciling)
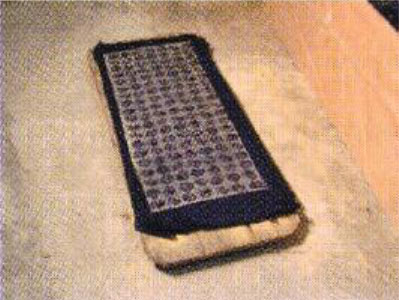
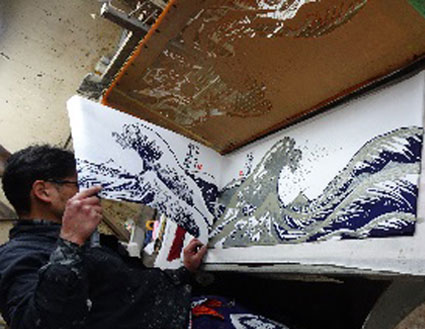
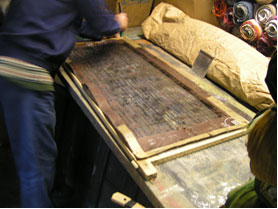
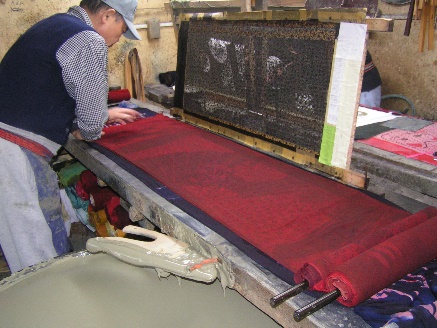
This process involves using a carved stencil paper (Kata-gami) and a spatula (Hera) to apply resist paste to the fabric. This workspace is also referred to as the “Itaba” (board area).
The work is performed while precisely folding the fabric back and forth in a screen-fold pattern (Byobu-datami). The resist paste is applied uniformly to both sides of the fabric.
The hardness of the paste and the pressure of application are adjusted to match the specific pattern.
For Yukata fabric, which is used continuously as a single tan (roll), it is particularly crucial that the patterns connect seamlessly at the folded sections and that the stenciling is consistently uniform.

The fabric is spread out onto the stenciling board (Katatsuke-dai). It is precisely folded back at the edge position of the stencil.
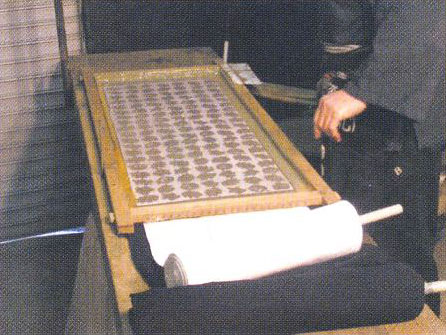
The stencil paper, fixed within a wooden frame, is placed down onto the spread-out fabric, and resist paste is scraped across it using a spatula (hera).

The stencil is lifted, and the fabric is precisely folded over again. This process is repeated.
Note: Tokyo Honzome Chūsen prioritizes a meticulous and precise dye finish, fundamentally limiting continuous stenciling to approximately two tan (rolls) for Yukata fabric and four tan for Tenugui (hand towels) at a time.
Sawdust is sprinkled onto the fabric after stenciling to prevent the paste from becoming sticky.
2. Dyeing shall be performed using the following techniques or skills:
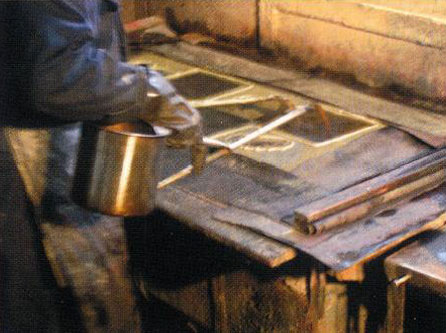
- Pouring dye over the stenciled fabric using a special kettle (Yakan).
- Dyeing shall be performed from both the front and back sides using one or more of the following techniques: “single-color dyeing (Isshiki-zome),” “partitioned dyeing (Sashiwake-zome),” “gradation dyeing (Bokashi-zome),” or “Hosokawa dyeing (Hosokawa-zome).”
- In the case of “partitioned dyeing,” and for parts of “gradation dyeing” and “Hosokawa dyeing,” a paste-extruding cylinder (Nori-zutsu) shall be used to create paste embankments (levees) before dyeing.
- When dyeing fine patterns, a pushing stick (Tsuki-bō) shall be used to guide the dye solution to the specified locations.
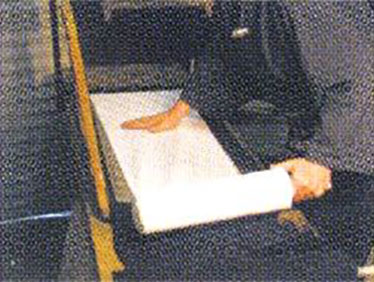
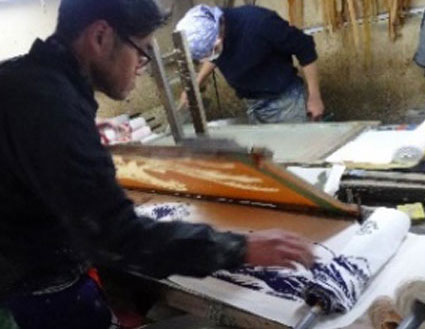
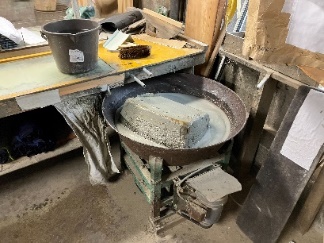
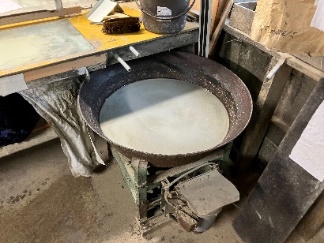
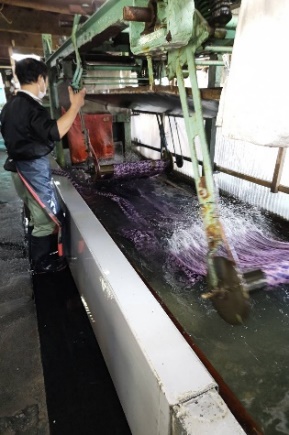
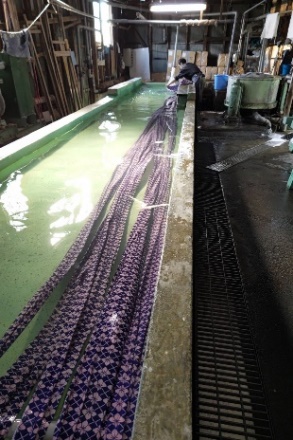
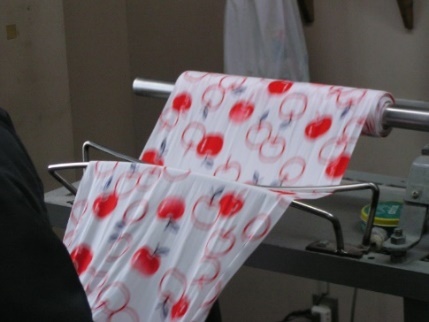
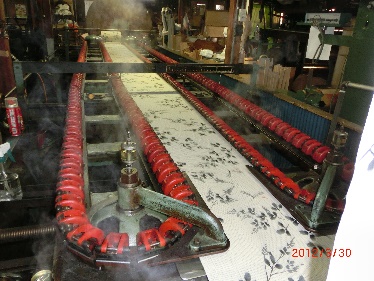
[Main Process 2] Chūsen (Pour-Dyeing)
This process involves placing the stenciled fabric onto the Chūsen-dai (dyeing table) and pouring the dye solution over it from above using a specialized kettle (Yakan) to make it permeate the fabric. The dyeing workspace is also referred to as the “kōya” (indigo dyeworks).
The appropriate pouring method (technique and volume) and the timing of suction differ depending on the type of dye used and the nature of the pattern.
There are four types of techniques: Isshiki-zome (single-color dyeing), Sashiwake-zome (partitioned dyeing), Bokashi-zome (gradation dyeing), and Hosokawa-zome (Hosokawa dyeing). Each requires a high level of technical skill.
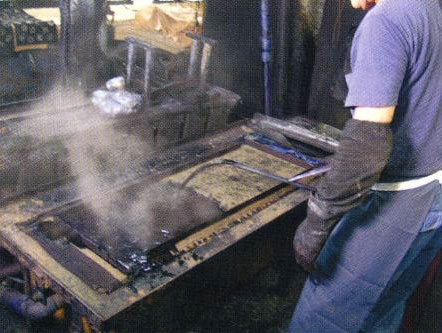
The layered fabric is placed on the dyeing table, and the dye solution is poured over it from above.
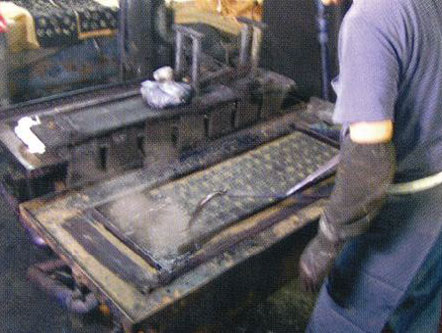
The entire stack of fabric is flipped over, and the dyeing process is repeated from the reverse side.
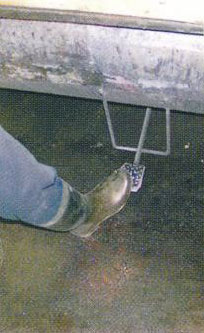
A vacuum pressure device is located beneath the dyeing table; pressing a pedal activates suction to draw the dye through the layers.
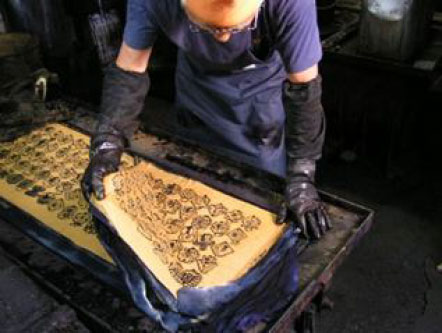
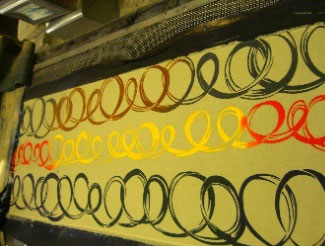
A view of the fabric after the dyeing process, when it has been lifted (mekutta tokoro). The light brown sections are the resist paste.
Note: In Tokyo Honzome Chūsen, a specialized kettle (Yakan) with a long spout is traditionally used for pouring the dye.
[Main Process 2] Chūsen (Pour-Dyeing)-1
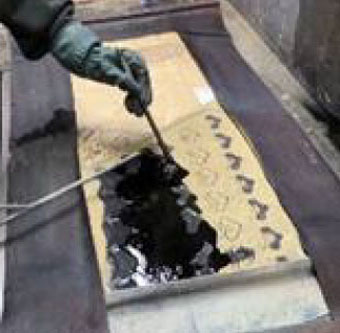
Isshiki-zome (single-color dyeing)
It is a technique that uses only a single color of dye.
Items with a lot of undyed white space are called “Shiroji Isshiki” (white-base single color), while those with a lot of dyed area are called “Jizomari Isshiki” (solid-base single color).
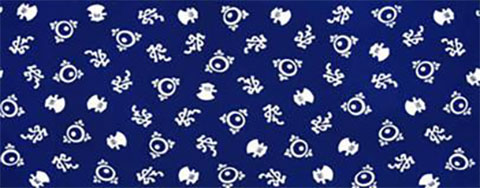
In Tokyo, a single-color dye of navy blue and white is favored as an Edo-style color scheme. Single-color dyeing is particularly preferred for Yukata with patterns that are difficult to stencil.
A pushing stick (Tsuki-bō) may be used to confirm how well the dye is permeating the fabric and to gauge the timing for suction. If the amount or speed of pouring is incorrect, uneven dyeing and blotches can easily occur.
Care must be taken with the volume of dye poured and the speed of the application.
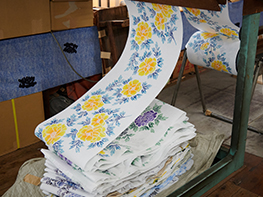
Example of Shiroji Isshiki(white-base single color) Yukata fabric.
Example of Jizomari Isshiki(solid-base single color) Yukata fabric.
[Main Process 2] Chūsen (Pour-Dyeing)-2
Sashiwake-zome (partitioned dyeing)
It is a technique for dyeing multiple colors separately within a single stenciling and Chūsen process.
This unique dyeing method is only possible through Chūsen, where dye is poured from above. The more colors and intricate the pattern, the more complex the pouring method becomes. A pushing stick (tsuki-bō) is used for fine, detailed partitioned dyeing (Sashiwake-zome).
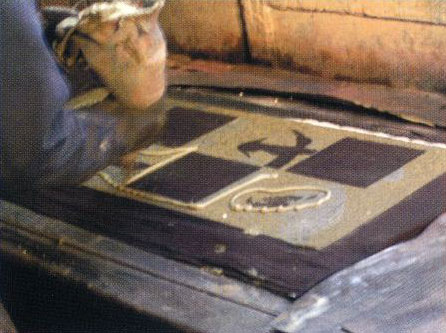
Using a paste-extruding cylinder (nori-zutsu), paste embankments (levees) are created for each color segment.
Dyes are poured one color at a time into their respective sections.
For fine, detailed partitioned dyeing, a “pushing stick” (Tsuki-bō) is used to guide the appropriate amount of dye to the required areas.
Note: The pushing stick is a tool unique to Tokyo Chūsen, used to achieve a careful, high-quality finish.
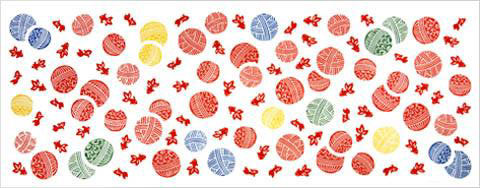
Example of a Sashiwake-zome (partitioned dyeing) Tenugui.
[Main Process 2] Chūsen (Pour-Dyeing)-3
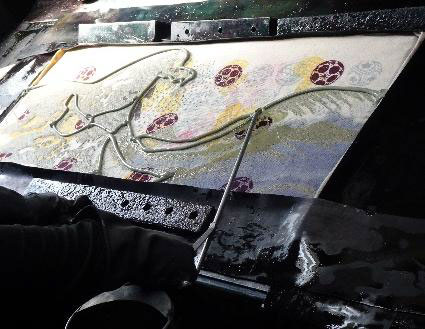
Bokashi-zome (gradation dyeing)
It is a technique where different colors of dye are poured simultaneously without creating a clear boundary, expressing a “gradation” (Bokashi).
This expression method is unique to Chūsen, where the process is controlled yet relies on the natural permeation of the dye. The craftsperson reproduces the effect by hand, referencing the design specifications. Everything depends entirely on the artisan’s manual skill and feel. Sometimes the gradation is created solely by the artisan’s hand movements without creating paste embankments, which requires an especially high level of technical skill.
When not using paste embankments: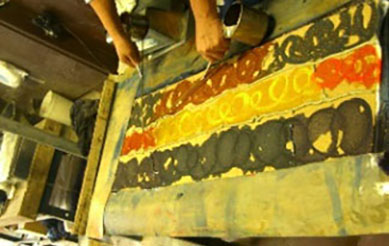
Different colors of dye are put into the kettles (Yakan) held in the left and right hands, and poured simultaneously.
![]()
When using paste embankments: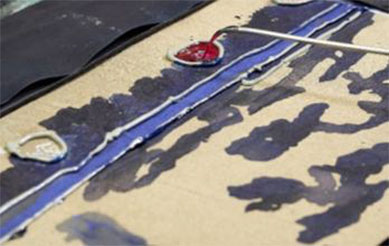
Depending on the nature of the pattern, paste embankments (levees) are partially drawn according to the design before the dye is poured.

Example of a Bokashi-zome (gradation dyeing) Tenugui.
For commercial products, a consistent level of gradation must be repeated across items.
[Main Process 2] Chūsen (Pour-Dyeing)-4
Hosokawa-zome (Hosokawa dyeing)
This is an extremely labor-intensive technique involving dyeing the fabric once, washing and drying it, and then repeating the stenciling and dyeing process a second time to achieve multi-color patterns.
Some degree of shrinkage in the fabric after the first dyeing is unavoidable. Even a slight misalignment during rolling the fabric after drying will affect the second stenciling process. Stenciling for “Hamari Hosokawa” (fitted Hosokawa), where the pattern from the first dye must align perfectly with the second, is extremely difficult and requires particular expertise.
The fabric after the first round of dyeing, washing, dehydrating (spinning), and drying is complete.
The second stenciling process for Hosokawa-zome. Aligning the patterns is difficult.
Pouring the dye. The designs for Hosokawa-zome often involve complex color schemes.
Example of a Hosokawa-zome Tenugui:
The finished product.
Traditional Raw Materials (as designated by official notification for traditional craft products)
The fabric shall be made of cotton textiles, linen textiles, silk textiles, or materials possessing equivalent properties to these.
Tools Used in the Main Processes
| Process Number | Process Name | Tool Name | Tool Photo / Image of Tool | Purpose/Role of the Tool | ||
|---|---|---|---|---|---|---|
| ⑤ | Stenciling (Katatsuke) | Spatula (Hera) | 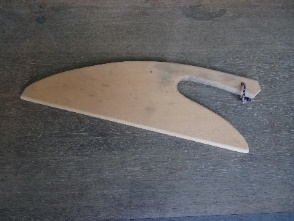 |
During stenciling, the stencil paper stretched onto the wooden frame is set onto the stenciling board. The resist paste is then uniformly scraped across the stencil using this “spatula”. The spatulas are made from soft woods, such as cedar (sugi). | ||
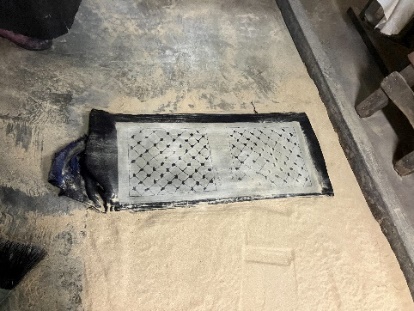
| ⑤ | Stenciling (Katatsuke) | Wooden Frame (Kiwaku) | 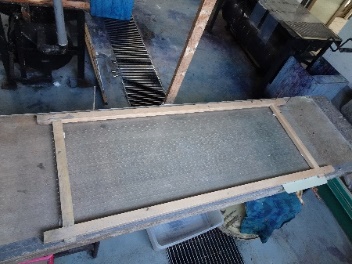 |
A wooden frame used to stretch the stencil paper tight. The stencil paper is fixed to this wooden frame using special tacks (Byō). The frames are made from soft woods, such as cedar (sugi). | ||
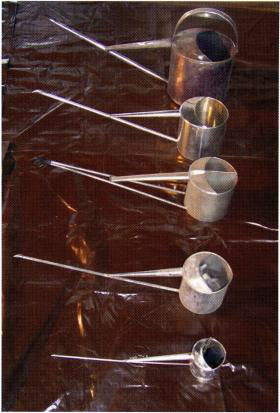
| ⑦ | Dyeing (Chūsen – Pour-Dyeing) | Kettle (Yakan) |  |
A tool used for pouring the dye solution during “Chūsen”. The Tokyo-style kettle is characterized by its long spout. There are various sizes of kettles depending on the volume of dye required. | ||
| ⑦ | Dyeing (Chūsen – Pour-Dyeing) | Pushing Stick (Tsuki-bō / also called Annai-bō or Guiding Stick) | 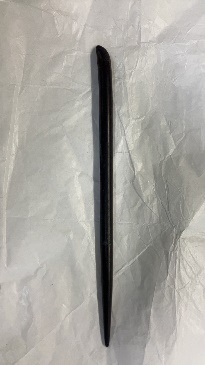 |
 |
A stick made of ebonite (hard rubber). The fabric roll (Tanmono) is pressed down with this stick to guide the flow of the dye poured from the kettle. It is essential for ensuring that the specified color reaches the correct location, particularly in partitioned dyeing (Sashiwake-zome). This is a tool unique to Tokyo, used in the pursuit of meticulous precision. | |
Manufacturing Process
| Process Number | Process Name | Name of Tool Used / Tools Used | Specific Details / Detailed Description |
|---|---|---|---|
| ① | Fabric preparation(Neriji) | Water Tank (Suisō) | The fabric is placed in a water tank and the bleached cloth is steeped in water overnight. This is done to remove the folding creases from the bleached cloth that was delivered in a folded state.
 |
| ② | Drying (Kansō) | Drying Rack (Yagura) | The fabric, which has been dewatered using a centrifugal hydroextractor, is hung to dry on a drying rack (Yagura).
 Centrifugal Hydroextractor: (A machine used for spinning excess water out of the fabric) 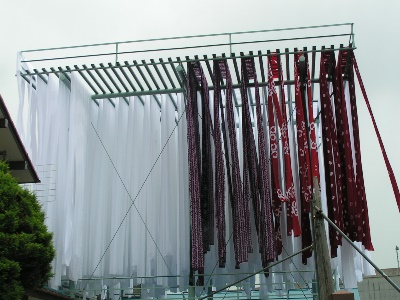 The white fabric on the left half of the Yagura: (The fabric shown) is after the steeping/soaking process (Neriji). |
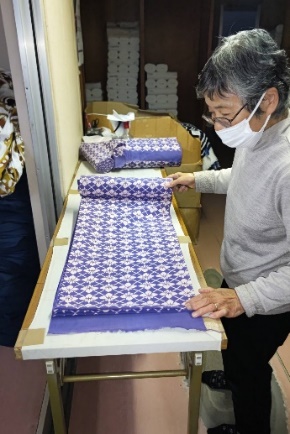
| ③ | Rolling the Fabric (Jimaki) | Winding Machine (Makitori-ki) | The dried fabric is wound into tight rolls using a winding machine to smooth out wrinkles (serving as a form of inspection), and then stacked and stored for one to two days.
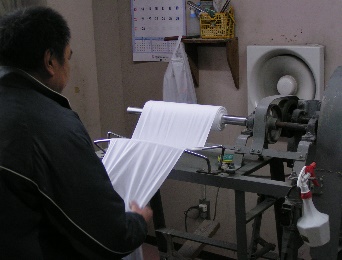
Winding Machine (In use): The person on the left holds the edge of the fabric while it is wrapped around a rotating rod. 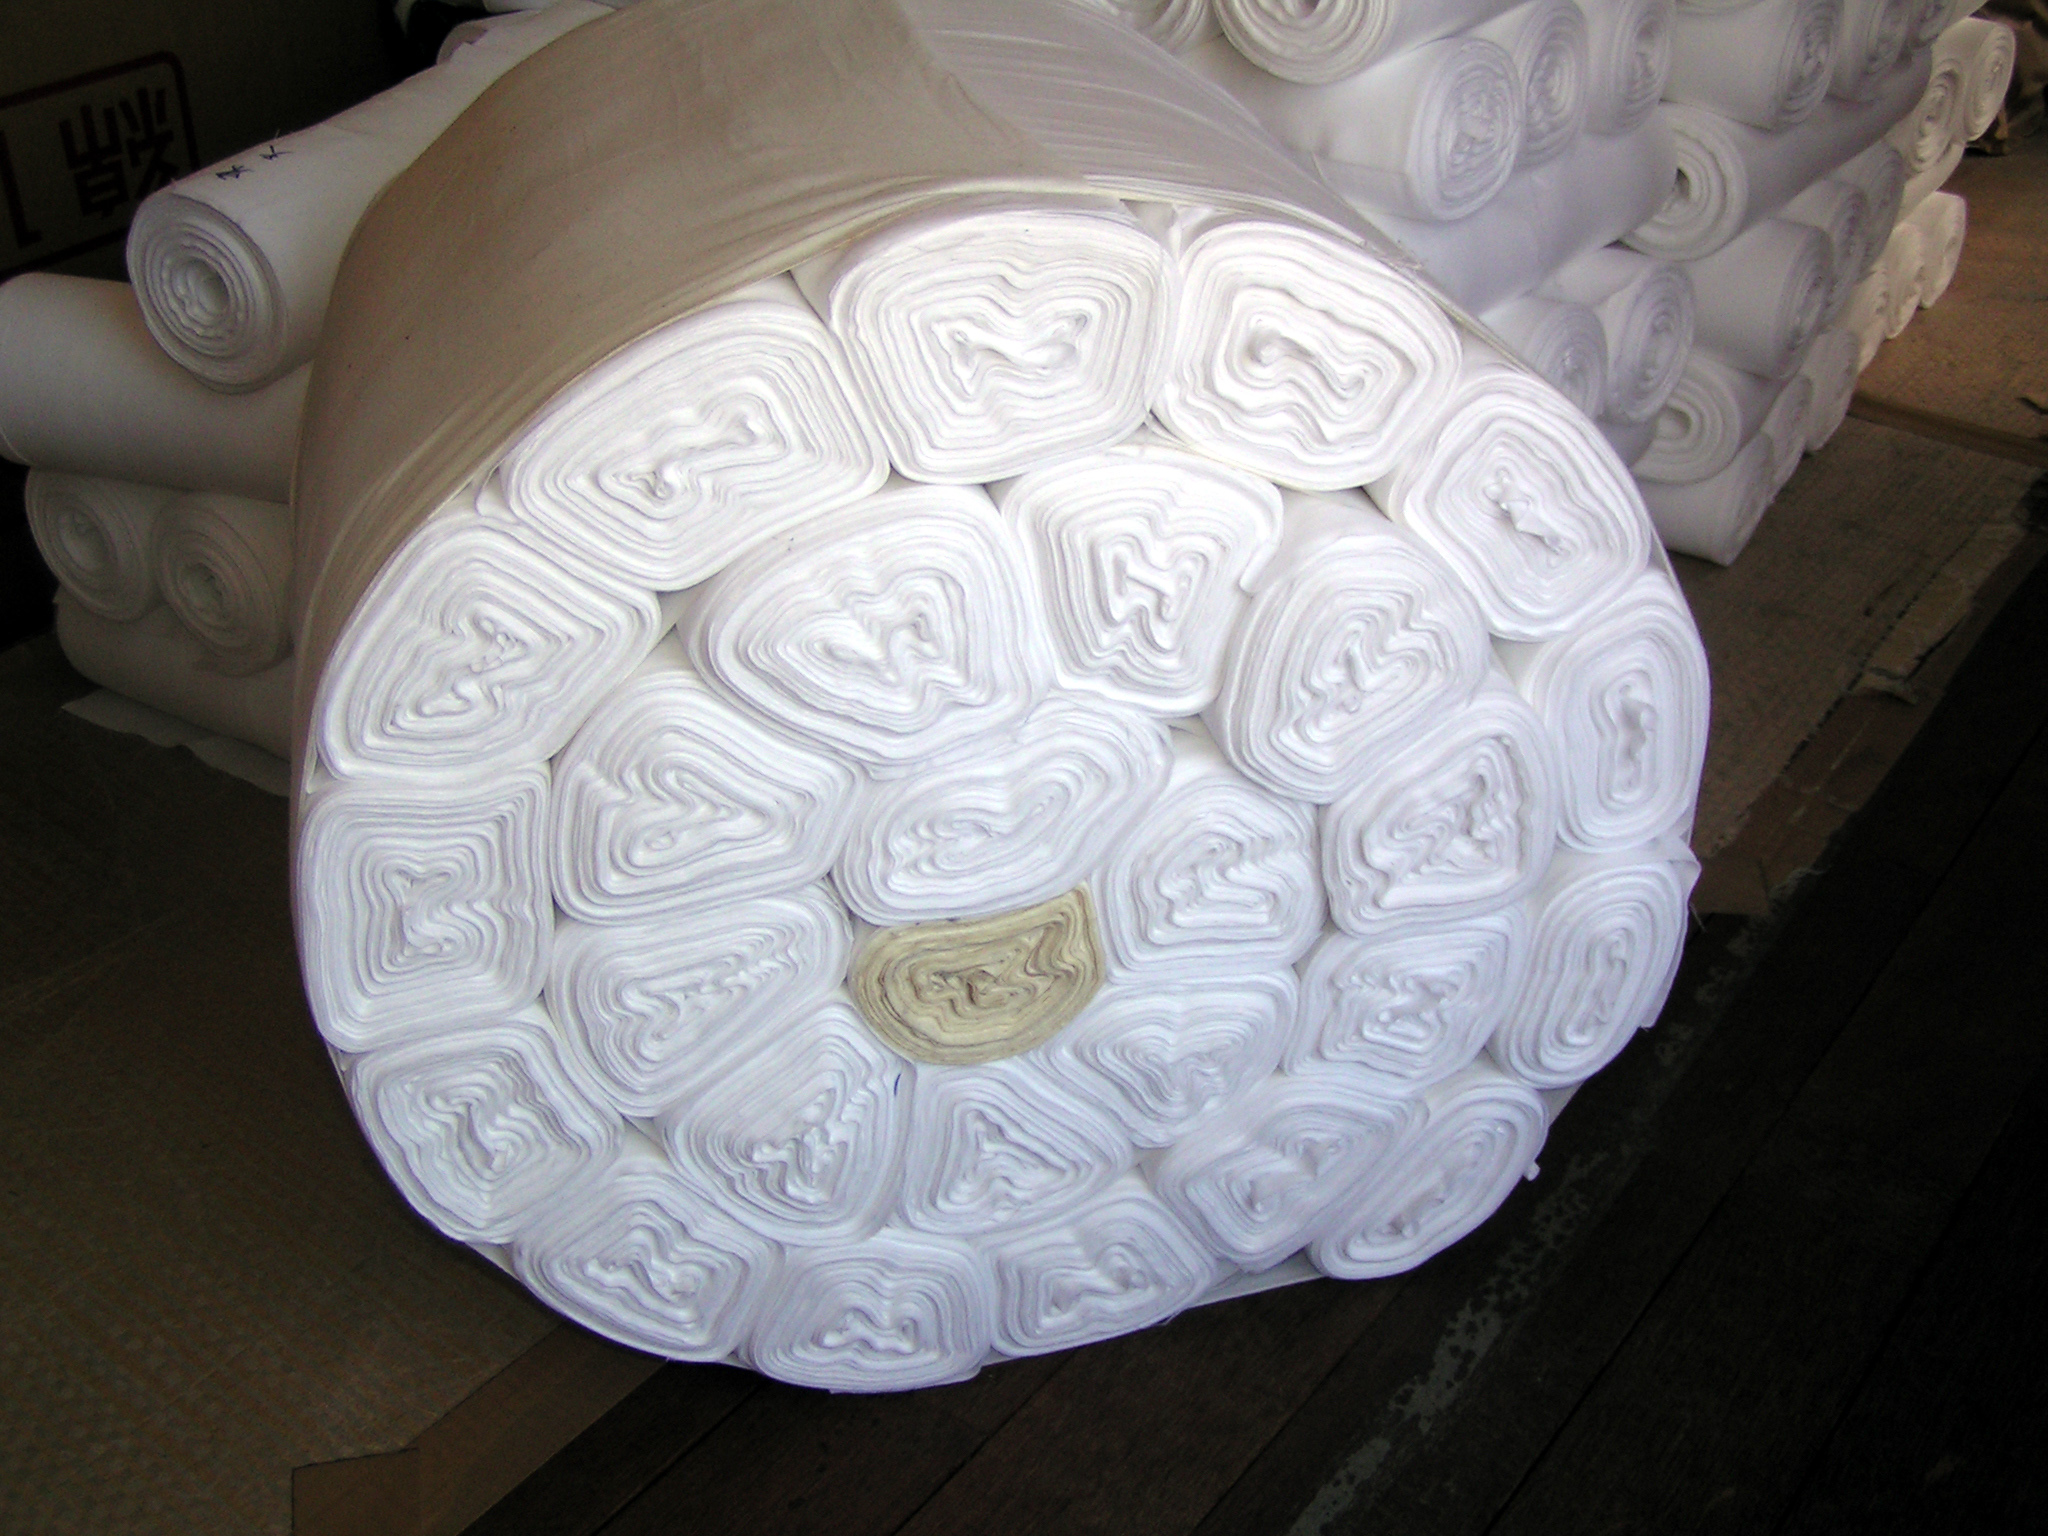
A collection of several dozen wound Tanmono (fabric rolls): (Image description of the stacked rolls). Note: Over 100 years ago, this specific process was performed entirely by hand. |
| ④ | Paste Preparation (Nori-Chōgō) | Paste Mixer (Nori-Kakuhan-ki) | A paste made by mixing seaweed glue (such as fu-nori) and clay, or a genuine rice paste (shin-nori) made from sweet rice and rice bran, is prepared according to the usage conditions and mixed using a mixer.
 A top-down view of the paste mixer:
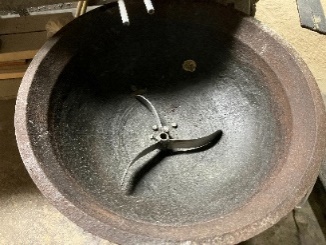
Agitation blades are attached to the bottom of the machine; these rotate via a motor to mix the paste, water, and other ingredients.
 The paste (seaweed glue) has been added:(A description of the step where ingredients are placed in the mixer.)
 The agitation blades spinning and mixing the paste:
The stenciling board is visible in the upper left; the paste prepared in this mixer is scooped out with a spatula (hera) and used for stenciling.
Note: Over 100 years ago, ingredients like paste were put into wooden barrels and stirred by hand using a stick. |
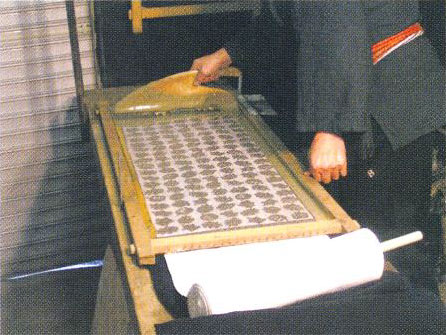
| ⑤ | Stenciling (Katatsuke) (Main Process 1) |
Stenciling board (Katatsuke-dai), spatula (Hera), stencil paper (Katagami), wooden frame (Kiwaku) | The stencil paper is set into the wooden frame, the rolled fabric (jimaki) is placed on the stenciling board, and the process of applying paste with a spatula is repeated (approximately 20 times for two tan of fabric). This adheres the paste to both sides of the cloth.
 The stencil paper is soaked in water to make it soft and pliable. It is then attached to the four sides of the wooden frame using tacks (Byō), ensuring the nylon monofilament (tegus) of the frame and the gauze (sha) of the stencil paper make contact.
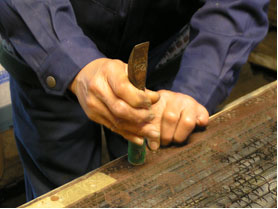 The tacks are being driven in with a tack hammer (Byō-uchi).
 Tack hammer (Byō-uchi) (top) and tacks (Byō) (bottom):
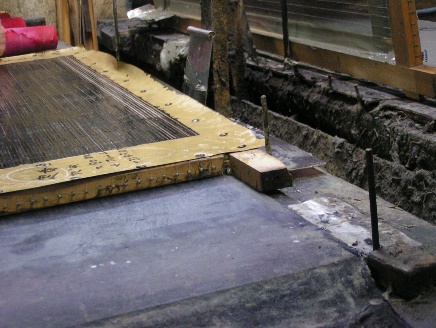 The stencil paper, fixed in the wooden frame, is used for applying the paste on the stenciling board. To ensure stenciling occurs in the exact same position every time, guide marks (such as nails) are affixed to the stenciling board.
 To prevent the fabric from getting dirty, two “practice” stenciling runs are done on a scrap cloth before working on the actual product fabric. After the first practice run, the scrap cloth is folded over and stenciling is done on top of it again, before finally beginning the stenciling process on the actual fabric.
 (1) A rotating rod is inserted into the center of the rolled fabric (bleached cloth), and the fabric is spread out onto the stenciling board from left to right.
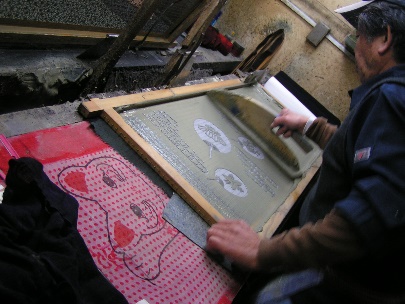 (2) The wooden stencil frame is lowered onto the fabric, and the paste is scraped across it.
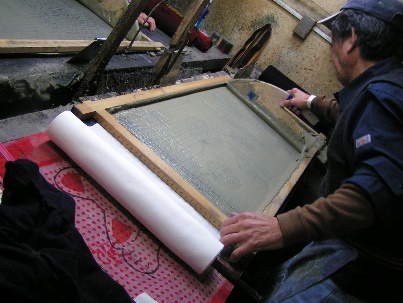 (3) The frame is lifted, and after the paste has been spread across the fabric from right to left, the scraping process is completed.
 (4) The stencil paper is lifted away. The pattern from the gaps in the stencil is transferred onto the fabric. After this step, the process returns to step (1), and the paste is scraped on repeatedly, folding the fabric into an accordion shape for about 20 layers. In this way, paste is applied to both sides of the cloth.
 Sawdust is sprinkled on both sides of the approximately 20 layers of fabric after the paste application is complete. Without this step, the paste would be sticky and adhere to the dyeing table and other surfaces.
|
| ⑥ | Dye Mixing (Senryō no Haigō) | Mixing Container (Haigō-yō Yōki) | Prepare the necessary hot or cold water in a mixing container and weigh the dyes and auxiliaries. To the dye, add either Turkey Red Oil or alcohol to create a paste, then thin it with hot water. Dissolve the dye in water, add the auxiliaries, and adjust to the appropriate temperature for the specific dye.
For sulfur dyes, maintain a temperature of 60°C–70°C and allow some time for reduction (to remove air from the solution) before use. For naphthol dyes, the dye liquor should be prepared at 30°C–50°C. When using naphthol dyes, prepare the top-coat dye (developing agent). The required amount varies depending on the combination, but generally, the top-coat dye should be approximately 1 to 4 times the amount of the base-coat dye (preparing agent). No auxiliaries are used for the top-coat solution; after dissolving the dye, thin it with cold water to create the final liquor. Once the base-coat solution has been poured and suctioned, apply the top-coat dye. Note: Over 100 years ago, natural indigo dye and artificial indigo (vat dyes) were mainly used. |
| ⑦ | Dyeing (Chūsen – Pour-Dyeing) (Main Process 2) | Dyeing table (Chūsen-dai), Kettle (Yakan) |
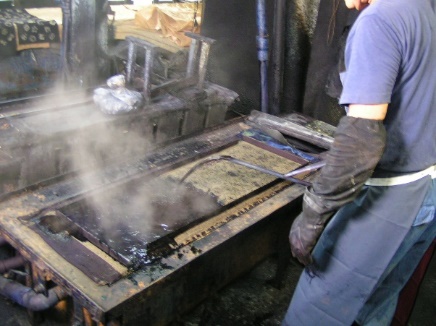 The fabric, which has been stenciled and sprinkled with sawdust, is placed on the Chūsen-dai (Dyeing table). To ensure the dye does not overflow the edges, the dye solution is poured from above using a Yakan (Kettle) to permeate the fabric.
Center of the photo: The “Chūsen-dai” (Dyeing table) is located here. The person on the right: Is holding a Yakan in their right hand.  Bellows (Fuigo)  Funnels (Rōto) Currently, a vacuum pressure device is used to suction the dye from beneath the laid-out cloth. Note: More than 100 years ago, pressure was applied using funnels (Rōto) or bellows (Fuigo). |
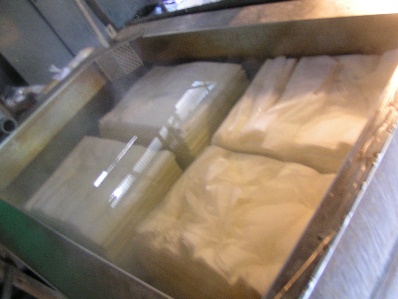
| ⑧ | Washing (Suisen) | Washing Machine (Suisen-ki) | The paste and any unfixed dye adhering to the dyed fabric are washed off using only water.
  Note: Over 100 years ago, this was done in rivers or factory water areas (water channels or tanks) using a method called “Sao-furi” (pole-swinging), which involved attaching the cloth to the end of a bamboo pole and swinging it from side to side in the water to wash it. |
| ⑨ | Drying (Kansō) | Drying Rack (Yagura), Centrifugal Hydroextractor | The fabric is dewatered using a centrifugal hydroextractor after washing, and then naturally air-dried on a drying rack (Yagura).
 The washed fabric is placed into the centrifugal hydroextractor for dewatering.
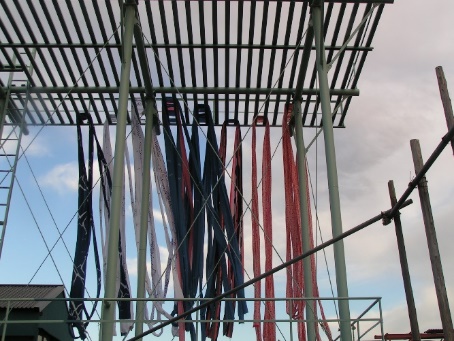 The dewatered fabric is naturally air-dried on the drying rack (Yagura).
|
| ⑩ | Winding and Fabric Inspection (Makitori/Kentan) | Winding Machine (Makitori-ki) | The dried fabric is inspected while being wound by a winding machine (Makitori-ki).
 The person on the left holds the edge of the fabric, and it is wound onto a motorized rotating rod.
Note: Over 100 years ago, this was done solely by hand. |
| ⑪ | Finishing Process (Tenugui) | Pressurization Roll (Kaatsu Roll) | The freshly dyed and wound Tenugui fabric is folded to the length of a Tenugui (90 to 120 cm) and passed through pressure rollers to reduce wrinkles and add luster (sheen). The fabric is then cut with scissors to the specific Tenugui length, folded to an appropriate size, and finished as a product.
 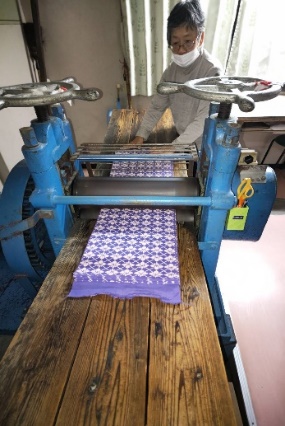 Note: Simple wrinkle-smoothing machines have been in use for over 100 years. |
| ⑫ | Finishing Process (Outsourced) (Seiri Kakō) (Yukata) | Finishing Machine (Seiri-ki / Tenter machine) |
The dyed Yukata fabric is re-wetted and dried again to remove wrinkles, a light starch is applied, and then the width of the fabric is adjusted using a finishing machine (tenter machine). It is then finished as a rolled or folded “Yukata fabric” (Tanmono) product. (This is the process carried out by the finishing subcontractor).
|
Main Reference:
Supervised and Edited by Mikiko Osawa, Hon-zome Tenugui no Dekiru Made: Takumi no Waza ni Ikizuku Chūsen (Until Hon-zome Tenugui is Made: The Artisan Techniques Alive in Chūsen), Kanto Chūsen Industry Cooperative Association, 2005.
Finishing (Arrangement) Process
 ① The edges of the fabric rolls (Tanmono) are aligned according to the type of fabric.
 ② The rolls are sewn together and connected (end-to-end).
 ③ A thin layer of starch (sizing agent) is applied to the fabric, and it is dried.
 ④ The width of the fabric is standardized and wrinkles are removed using a machine called a tenter (tenter frame).
 ⑤ At the exit of the tenter, the fabric is shaken down (or “plaited down”).
 ⑥ The shaken fabric is then wound using a winding machine (winder).
 ⑦ The wound fabric roll is finished by securing it with thread or other methods.
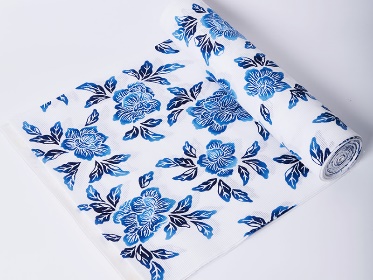 ⑧ Finished Product (Fabric Roll for Sale)
Overview of the Formation of Chūsen Tenugui and Yukata Fabric Production Areas in Edo/Tokyo
| Date | Item |
|---|---|
| 1801-04 (Kyowa Period) |
Tenugui dyeing begins in Edo, and many Tenugui shops open (Buko Nenpyo by Saito Gekko, 1850; entry for the Kyowa era). |
| c. 1804-18 (Bunka Period) |
Tenugui kon’ya (dye houses) begin to concentrate around the Kanda area (Juzo Nakamura, “The Past and Present of Tenugui,” 1957). |
| Pre-1868 | Before the Meiji Restoration, there were 17 households (businesses) involved in Tenugui dyeing in Edo (later Chūsen dyeing businesses) (“Kogyo Gaikyo Meiji Juhachi-nen” in Nosho-ko Gaikyo, Ministry of Agriculture and Commerce). |
| 1885 (Meiji 18) |
Due to competition from other production areas starting around 1872-73 (Meiji 5-6), the number of Tenugui dyeing businesses in Tokyo decreases to 10 (Ibid.). |
| Post c. 1901-02 |
Osaka-made single-color Chūsen Yukata fabric starts appearing in Tokyo markets. Subsequently, Tokyo Yukata fabric wholesalers and Tenugui dye factories collaborate to begin Chūsen Yukata fabric production, researching dyeing techniques and designs throughout the Taisho period. In the early Showa period, Tokyo becomes the center for Yukata fabric (Naoko Okubo, 2022). |
| c. 1909 (Meiji 42) |
A list of dyeing, finishing, and other processing industries in Tokyo by the Ministry of Agriculture and Commerce includes 17 tenugui dye factories (Chūsen factories), including those founded during the late Edo period (Kojo Tsuran 2-satsu Meiji 42-nen Jumatsu-jitsu Genzai compiled by the Commerce and Industry Bureau, Ministry of Agriculture and Commerce, 1911). |
| 1936 (Showa 11) |
Number of Chūsen factories in the Tokyo suburbs reaches 167. They are spread across Koto, Sumida, Edogawa, Kita, Arakawa, Katsushika, Adachi areas, and the southern part of Saitama Prefecture (Ichiro Nagatsu, 1959). |
| 1938 (Showa 13) |
June 29: The Extraordinary Control Ordinance for Cotton Products is enforced. Control begins over the processing and sale of cotton Chūsen Tenugui and Yukata fabric. |
| c. 1941 (Showa 16) |
The Tokyo Tenugui Chugata Cooperative, a Chūsen industry association, exists until around 1941 but is dissolved due to the wartime system. |
| 1951 (Showa 26) |
May: The Kanto Chūsen Industry Cooperative Association is established. July: Economic controls on cotton products are abolished. *Please refer to the section “About the Kanto Chūsen Industry Cooperative Association” for information thereafter. |
Main References:
Ichiro Nagatsu, “Regarding Chūsen Industry Workers in Tokyo and Its Vicinity,” Tokyo Gakugei University Research Bulletin (10) 1959; Naoko Okubo, “Modernization of Tokyo Chugata Yukata and the Development of Chūsen : Handiwork Becoming Contemporary,” Miyagi Gakuin Women’s University Research Papers (134) 2022; Ibid., “The Beginning of Chūsen in the Edo/Tokyo Area,” Aesthetics of Clothing (71) 2025.
November 2025 edition
Supervised by: Naoko Okubo, Miyagi Gakuin Women’s University
 Contact Us